
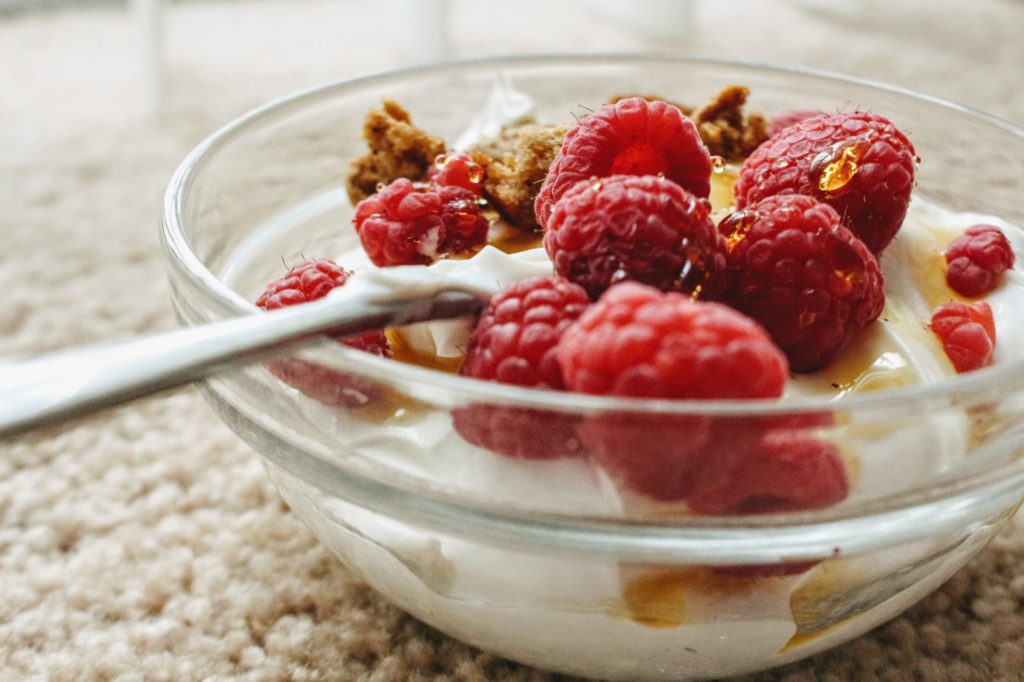
One of my favorite meals for breakfast is a nice big bowl of yogurt topped with fresh fruit and my Simple Homemade Granola. The mixture of flavors and textures is sooooo good! But, that’s not the only reason I love it. The probiotics in yogurt can benefit the gut microflora and help boost the immune system. A healthy gut is key to a healthy you. Learn more about that here.
That being said, buying good-quality yogurt can get expensive, especially at the rate my family eats it! As I saw how much yogurt we would eat every week, I became intrigued with the idea of making my own yogurt. But the process seemed so complicated and overwhelming. But friends, can I just tell you that it doesn’t have to be? Especially when you have an instant pot!!
A few years ago I used some birthday money to buy myself an Instant Pot. What a game changer that purchase was!! I purposefully bought an Instant Pot with a built-in yogurt function so that I could start learning how to make my own. And I’ll never go back!

Yogurt 4 Ways
I’m going to share four recipes below:
- boil method (basic recipe)
- cold-start method (a little simpler than boil method)
- dairy-free (vegan, paleo, and keto friendly) recipe
- “no yogurt button” (if your IP doesn’t have the yogurt function, you can still make yogurt!)
That’s right, you don’t have to have “the” button in order to make your own yogurt! Pick your preference and enjoy!
Recipe overview
Homemade yogurt in the instant pot takes almost a full day to complete, depending on how long you choose to incubate. It’s a lengthy process, but it’s really fairly simple. Once I had done it once it felt so easy! It only requires 2 ingredients: milk and a little bit of yogurt. Yes, you need yogurt to make yogurt. It has the live and active cultures needed to make more yogurt. If making the dairy-free option, you will need an additional 1-2 ingredients.
The basic process goes as follows: you start with the main ingredient (milk) and bring it up to the right temperature to kill off bacteria. Then you cool it down to the right temperature for incubating, add the starter, and let the yogurt incubate. BAM! It’s really that simple.
But first, some quick notes...
Milk thickness
To get the thickest and creamiest yogurt, use whole milk. If you use a lower fat milk it will be thinner, but you can strain to thicken it up.
Incubation duration
Yogurt can be incubated anywhere from 8-24 hours. It needs at least 8 hours for the good bacteria to culture and thicken up. When allowed to ferment for 24 hours, good bacteria has more time to multiply and helps consume the lactose, allowing it to be easier to digest. Longer incubation periods also help the yogurt to thicken more. So, if you have a lactose intolerance, consider incubating for as long as you can, up to the 24 hours. One more thing to consider is the longer you incubate, the tangier it will be.
Sweetener
Feel free to sweeten your yogurt with vanilla extract, honey, maple syrup, fruit, or even jam AFTER incubating so as not to mess with the incubation process.
Yogurt starter
I find 3 Tablespoons of starter works great. Some recipes will call for up to 1/4 cup. The more starter you add, the thicker your yogurt will be. Just don’t go over 1/4 cup as it will affect the recipe.
To make your future batches easier, consider freezing your starter immediately after a fresh yogurt is made. I recommend using an ice cube tray like this one because it comes with a lid and the cubes are easy to pop out only the ones you want. Each ice cube holds 1 tablespoon of yogurt so you will know exactly how much to defrost when making a new batch. Just be sure to thaw your yogurt cubes in the fridge to not alter the active cultures. If you don’t freeze, just make sure not to eat all of your yogurt without saving some for the next batch!
Making Greek yogurt
If you prefer your yogurt even thicker than it is after refrigerating, strain it using cheese cloth or a nut milk bag. I recommend these due to the fact that they are made from organic cotton, and you get three. You’ll definitely want more than one. I set the bags in a strainer and set the strainer in a bowl so the whey can drip out. Allow to drip for 1-4 hours. The longer you allow the whey to drip out, the thicker the yogurt will be. If you plan on letting it drip for very long, I recommend setting the bowl in the refrigerator. If you choose to strain the whey out of the yogurt, you can keep it to use in smoothies, salad dressing, for baking, and more for added probiotic nutrition.
Shelf life
Store the yogurt in the refrigerator and it will be good for at least 1-2 weeks. Make sure to reserve 3 tablespoons to be the starter for your next batch.
Before beginning
Before you start, it is important to make sure that your instant pot is very clean from the pot insert to the lid and the sealing ring.

Making instant pot yogurt following the boil function method is what I would consider the “traditional” recipe.
Instant Pot Yogurt (Boil Function)
Ingredients:
1 gallon milk
3 Tablespoons plain Greek yogurt (with active cultures)
Instructions:
Pour 1 gallon of milk (the more fat, the creamier the yogurt) into the instant pot insert. Push “Yogurt” until the screen reads “boil.” Depending on your instant pot model, you may need to use an “Adjust” button to do this. Place the lid on and walk away. The milk will be heated until boiling, which takes about 45 minutes to an hour.
Once the boil cycle is finished and the instant pot beeps, give the milk a good stir with a whisk and then use a thermometer to read the temperature. I use a meat thermometer like this one. You want the milk to have reached 185 degrees. If it has not reached that temperature, use the “Saute” function on low to heat the milk until it reaches 185 degrees. Stir regularly to avoid burning on the bottom of the pot.
Once the milk has reached 185 degrees, remove the pot insert and place it in a sink full of ice water. You want the milk temperature to drop down to 110 degrees. Depending on how cold your water is, this will likely take around 10-15 minutes.
Once the milk reaches 110 degrees, pull out about 1 cup of the milk and mix in three tablespoons of your starter yogurt. NOTE: make sure the yogurt you use as a starter contains live and active cultures. Mix the yogurt starter in thoroughly and then add the milk back into the milk in the instant pot.
Dry the outside of the pot insert and place back into the instant pot and close the lid. Press the “Yogurt” button again until the screen shows the incubation period. For example, “8:00” or “24:00”. This is how long the instant pot will incubate. You can increase the time in 30 minute intervals. See note above for how long you might want to incubate. Make sure the instant pot is still set on “Normal” function and not “Less.”
Once the incubation period completes the instant pot will beep. You can refrigerate the yogurt as is, or strain it to make it into Greek yogurt (see note above). This would also be the proper time to add sweetener if you desire to do that. See note above for some ideas.

Cold-Start Instant Pot Yogurt
The benefit to this method of yogurt-making is that there are no thermometers needed, no boiling of the milk or bringing it to different temperatures, and it comes out thick automatically without the need for straining. The big thing to note is you MUST use Ultra Pasteurized Milk or Ultra Filtered Milk in order for the recipe to work. For the thickest, creamiest yogurt, ultra-filtered milk is best as it is pasteurized, but also goes through a special filtration process that leaves the milk with more protein, more calcium, less sugar, and it is lactose-free. Fairlife is a good brand to use.
Ingredients:
1 gallon Ultra Pasteurized or Ultra Filtered Milk
3 tablespoons plain yogurt with active cultures (or a yogurt starter)
Instructions:
Whisk 1 cup of the milk with the starter until well combined. Pour the remaining milk into the pot insert and whisk in the starter mixture. Place the lid on your instant pot and hit the “Yogurt” button until it reads “8:00”, or your desired incubation time. You can increase in 30 minute intervals. (See note above for why you may benefit from incubating up to 24 hours.) Make sure the instant pot is on “Normal” and not “Less.”
When the incubation is complete, the instant pot will beep. Take the lid off and remove the pot insert. Cover so that it is airtight and refrigerate for 8 hours. This will allow the yogurt to thicken. If you would like even thicker yogurt, follow the steps above in the notes section for making Greek yogurt. Once the refrigeration or straining period is done, you can transfer the yogurt into your desired storage container. This would also be the proper time to add sweetener if you desire to do that. See note above for some ideas.

Dairy-Free (Vegan, Paleo, and Keto Friendly) Yogurt
Ingredients:
½ gallon dairy-free milk (almond, coconut, oat – unsweetened and unflavored)
2 tablespoons sweetener (maple syrup, coconut sugar, or honey are great low-glycemic options)
3 tablespoons live cultures (this can be existing yogurt or a vegan yogurt starter)
2-4 tablespoons thickener (gelatin, cornstarch, flaxseed, kuzu root powder, arrowroot, tapioca, guar gum, agar-agar, xantham gum, or any other thickener of choice)
Instructions:
Pour the dairy-free milk into your instant pot insert and close the lid. NOTE: if using coconut milk, you’ll want to use full-fat canned coconut milk.
Press the “Yogurt” button until it says “Boil.” When the boil function is complete your instant pot will beep. It should take about 45 minutes. At that time, take the lid off, stir the milk and then check the temperature. Use a thermometer like this one. You want the milk to have reached 185 degrees. If it has not reached that temperature, use the “Saute” function on low to heat the milk until it reaches 185 degrees. Stir regularly to avoid burning on the bottom of the pot. Once the milk has reached 185 degrees, turn the sauté function off and stir in your thickener and sweetener of choice. The sweetener is optional, but it really helps feed the fermentation if you are using an unsweetened milk.
Remove the pot and place it in a sink full of ice water. You want the milk temperature to drop down to 110 degrees. Depending on how cold your water is, this will likely take around 10-15 minutes.
Once the milk reaches 110-115 degrees, pull the pot insert out of the ice water. Remove one cup of the milk, add in the starter, stir well, and then pour back into the remainder of the milk. Make sure it’s mixed thoroughly. NOTE: if using existing yogurt as your starter, make sure the yogurt contains live and active cultures.
Dry the outside of the pot insert and place back into the instant pot and close the lid. Press the “Yogurt” button again until the screen shows the incubation period. For example, “8:00” or “24:00”. This is how long the instant pot will incubate. You can increase the time in 30 minute intervals. See note above for how long you might want to incubate. See note below for how long you might want to incubate. Make sure the instant pot is still set on “Normal” function and not “Less.”
Once the incubation period completes the instant pot will beep. Take the pot insert out, cover well, and refrigerate for at least 6-8 hours. The yogurt will thicken as it cools. If you would like even thicker yogurt, follow the steps above in the notes section for making Greek yogurt. Once cooled, transfer into a glass or ceramic storage container. This would also be the proper time to add sweetener if you desire to do that. See note above for some ideas.
Store in the refrigerator.

"No Yogurt Button" Yogurt
Ingredients:
1 gallon milk of your choice (see above recipes for specific suggestions based on dietary needs)
3 tablespoons active cultures (this can be existing yogurt or a vegan yogurt starter)
ONLY IF MAKING DAIRY-FREE VERSION:
2 tablespoons sweetener (maple syrup, coconut sugar, or honey are great low-glycemic options)
2-4 tablespoons thickener (gelatin, cornstarch, flaxseed, kuzu root powder, arrowroot, tapioca, guar gum, agar-agar, xantham gum, or any other thickener of choice)
Pour your milk of choice into the instant pot insert and then seal the pot with the lid and seal closed. Press the “Keep Warm” button and leave the milk for 40-45 minutes. Then, release the lid and whisk the warm milk. Once mixed well, press the “Saute” button and heat the milk to 185 degrees, stirring constantly to prevent the milk from burning on the bottom of the pot. Use a thermometer like this one to check the temperature.
Once the milk has reached 185 degrees, turn the saute function off. (If making dairy-free yogurt, now is the time for you to stir in your thickener and sweetener of choice. The sweetener is optional, but it really helps feed the fermentation process if you are using an unsweetened milk.) Remove the pot and place it in a sink full of ice water. You want the milk temperature to drop down to 110 degrees. Depending on how cold your water is, this will likely take around 10-15 minutes.
Once the milk reaches 110 degrees, pull out about 1 cup of the milk and mix in the three tablespoons of your starter of choice. Make sure the starter is thoroughly mixed, and then add the milk back into the milk in the instant pot insert. Whisk thoroughly to ensure the starter is well incorporated.
Dry the outside of the pot insert and place back into the instant pot and close the lid. Make sure it is set to “seal” and not “vent.” The instant pot is off at this point. Wrap the entire instant pot in a thick towel or blanket and let it sit for 8-24 hours. See note above for tips on how to determine the best incubation period.
Once the incubation period completes, you can refrigerate the yogurt as is, or strain it to make it into Greek yogurt (see note above). This would also be the proper time to add sweetener if you desire to do that. See note above for some ideas.
There you have it…four ways to make your own yogurt from home! It really is a simple process once you get the hang of the steps. Comment below with which version you try, and how it turns out. I can’t wait to hear what you think!
Some of the links above are affiliate links. This means that, at zero cost to you, I will earn an affiliate commission if you click through the link and finalize a purchase. Thanks for your support!
Related posts:
- Healthy Baking Substitutes Baked goods are so yummy, but they can be filled with ingredients that lack nutritional value, that can cause inflammation or disrupt the function of a healthy gut. But it...
- Homemade Condensed Soup Recipes If you love casseroles but wish there was a way to make them healthier, then you're in luck! Making your own condensed soup is not only much better for you,...
- Simple Homemade Granola I love granola. I eat homemade yogurt almost every morning with fresh fruit, and I absolutely love topping it with granola. But buying granola at the store can be kinda...
- DIY Condensed Soups As I started trying to clean up what my family was eating, condensed soup is one of the areas I just didn’t really know how to address aside from avoiding...